
hobbies: how to make moonshine
home business weird funny food hobbies education metaphysics misc. entertainment travel tech sports science politics
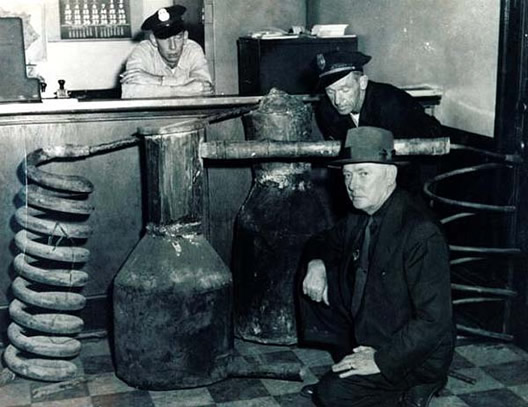 Building an alcohol still for moonshi ... errrr ... ummm i mean "fuel additive" is easy and fun. First, before we get to building we need to review some very important facts:
1) building an unlicensed alcohol still is ILLEGAL under federal law. getting busted is no joke. that being said, you can get a license to operate a small still for the purpose of distilling fuel additives rather than drinking. if interested, you can find more on the legallities here.
2) operating a homemade alcohol still is dangerous. it's best to build your still outside away from buildings and have fire extinguishers nearby.
3) i'm not advising anyone to build an alcohol still. the info below is for informational purposes only.
We are going to be building a simple tea kettle still. It's compact and easy to build.
PHASE I: fermentation process.
1) yeast. any supermarket brand will do but i prefer yeast specifically made for producing alcohol as it greatly reduces the time of fermenttion.
2) five pounds of sugar.
3) five gallon bucket with lid.
STEP 1: thoroughly clean bucket. be sure to rinse well as even a trace of soap will kill your yeast.
STEP 2: fill bucket with room temperature water. temp is important. too hot or cold and yeast won't activate. approx 90 degrees is perfect. stir in one pound of sugar for each gallon. add yeast.
STEP 3: punch a nail hole in lid of bucket and then attach lid to bucket. the nail hole is neccesary to keep the bucket from exploding when pressure increases from the CO2 created in the fermentation process.
let bucket sit for approximately one week (depending on yeast type and conditions). storage area should stay above 60 degrees fahrenheit.

PHASE II: assembling the still
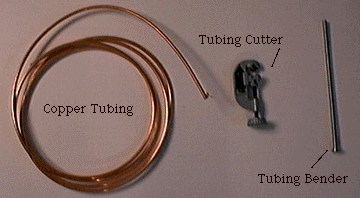
1) 1/4" copper tubing (approximately ten feet)
2) tubing cutter
3) 1/4" spring tubing bender
4) meat thermometer
5) tube of silicone sealant
6) tape measure
7) power drill
8) light (22 gauge) steel wire
9) large stainless steel teakettle (not aluminium).
IMPORTANT - Be certain that the teakettle has only one opening (at the mouth). Teakettles that have a removable top will not work.
10) Measure the mouth opening of your teakettle in millieters. You'll need a proper sized two hole rubber stopper, something like this. Be sure it's a tapered stopper w/ small side smaller than your teakettle mouth opening, and large side larger than opening.
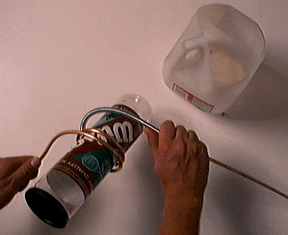
11) tennis ball can
12) electric hotplate
13) plastic milk conatiner
 |
 |
 |
 |
 |
STEP 1: Cut the top off plastic milk jug, leaving the handle intact.
STEP 2: Cut off about 5 feet of copper tubing.
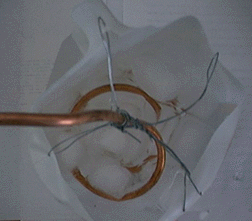
STEP 3: Use the tubing bender to wrap the coil around the tennis ball can. The spring coils of the bender will keep the copper tube from flattening and collapsing. Grab the spring bender with both hands and work it forward as you go. The idea is to always keep the part of the copper coil that you are bending centered in the bender. Leave about 24" on the top and 6" on the bottom straight. Blow through the tube to make sure that there is no blockage.
STEP 4 Drill a 1/4" hole about 1 1/2" from the bottom of the jug. Put the bottom part of the tubing through the hole. Bend the coils inside the jug so that no other part of the tubing touches the sides of the jug. Use lots of sealant on the inside and outside the jug to seal up the hole and hold the bottom part of the coil in place. Allow the sealant to dry overnight
STEP 5: Use the 1/8" bit to drill several holes in the top of the jug. Wrap wire around the top part of the coil that sticks up . Use the wire to center the coil so it doesn't touch the jug and is held in place in a sturdy manner.
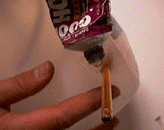
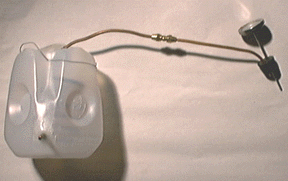
STEP 6: Fit the rubber stopper into the mouth of the teakettle to assure a snug fit.
STEP 7: Use vegetable oil to lubricate the end of the 24" piece of copper tubing and the meat thermometer. Insert the tubing and the thermometer into the stopper as pictured. Insert the stopper onto the mouth of the kettle. Never glue or tie the stopper down! This is a safety device! If there was a blockage in the tubing, the excess pressure would blow the stopper instead of exploding the kettle.
STEP 8: Set up the kettle on your electric hotplate (never use an open flame!) and your coil-jug (condenser) on a sturdy surface next to it. Try to slightly elevate the hotplate and teakettle so it is higher than the output tube on the condenser.
STEP 9: Check all connections to ensure that they are clear by blowing through them. Fill the teakettle halfway with your fermented mixture. Insert the stopper. Place the tea kettle on the electric hotplate and connect it to the condenser. Fill the condenser jug two thirds with ice water. Put a large jar under the end of the condenser tube. Turn the heat on medium-low and watch the thermometer carefully. Try to keep the temperature between 173 and 200 degrees farenheit. The goal is to boil off the alcohol and leave the water in the kettle. Alcohol boils at 173 and water boils at 212 degrees.
STEP 10: Your teakettle should now be very hot. It's important to disgard the first two ounces produced. This liquid contains methanol which boils off before the drinkable ethanol alcohol so empty the jar container after first few ounces and replace to capture the ethanol. Make sure to keep alot of ice in the condenser jug. Taste the output liquid occasionally. Near the end of distilling, as the temp approaches 212f, it will start to taste more like water. Turn off the hotplate. Using gloves, uncork the kettle, dump out the spent unused mash from the teakettle, and fill it with new mash. Replace the water in the condenser with cold water and more ice. Repeat until you used all of your mash.
OPTIONAL: let your ethanol cool, then strain through coffee filter filled with some aquarium charcoal.
OPTIONAL 2: you can now run your ethanol through the entire distilling process again for greater purity and higher potency.